That's why I'm building my own with cheap chinese made components. I'm at less than 50 bucks for all the parts bought and delivered.Missionary wrote:Greetings
Had two thermometers in ILLinois for a while but that was not a good idea. Brought one down here and am happy in both locations "knowing" what the lead temp is.
Keep reading about the PID's but it seems hurtful to have a control that costs far more than the pots I use.
Mike in Peru
PID build, lapping and other fun stuff....
-
DaveInGA
- 250 Shots

- Posts: 279
- Joined: 18 Nov 2015 08:59
- My Press Choice: Progressive
- Location: Jefferson, GA
- Has thanked: 91 times
- Been thanked: 85 times
Re: PID build, lapping and other fun stuff....
-
62chevy
- Founding Member

- Posts: 1617
- Joined: 17 Oct 2013 18:09
- My Press Choice: Turret
- Location: West Virginia
- Has thanked: 1017 times
- Been thanked: 323 times
Re: PID build, lapping and other fun stuff....
I've yet to find a complete parts list and howto to make my own for less than 50 bucks. Hint Hint, lol.DaveInGA wrote:That's why I'm building my own with cheap chinese made components. I'm at less than 50 bucks for all the parts bought and delivered.Missionary wrote:Greetings
Had two thermometers in ILLinois for a while but that was not a good idea. Brought one down here and am happy in both locations "knowing" what the lead temp is.
Keep reading about the PID's but it seems hurtful to have a control that costs far more than the pots I use.
Mike in Peru
Je suis Charlie
-
DaveInGA
- 250 Shots
- Posts: 279
- Joined: 18 Nov 2015 08:59
- My Press Choice: Progressive
- Location: Jefferson, GA
- Has thanked: 91 times
- Been thanked: 85 times
Re: PID build, lapping and other fun stuff....
62Chevy, here you go bud, the basic items one must have, delivered for under $50.00:
1. A PID - the Mypin TA4 is a good choice as it offers Farenheit readings vs celcius, plus with the number of folks using it, getting a American English instruction manual downloaded in .pdf form is easy:
http://www.ebay.com/itm/110862594914?_t ... EBIDX%3AIT
2. There has been a big argument on which solid state relay (SSR) to buy, but the fact is, if you heatsink the SSR, a 25 Amp unit is sufficient for the needs of the Lee pot application:
http://www.ebay.com/itm/310733303977?_t ... EBIDX%3AIT
That said, the supplier I bought this from has run out temporarily, so here's an alternative for less money, but higher amp rating:
http://www.ebay.com/itm/SSR-40A-DC-Cont ... 0733303977
3. Finally, a temperature probe, K type, rated for the temperature range you are in and long enough for the application. Since I will also use this in my smelting pot, I ordered a longer 15CM (7.5") version. I also ordered a spare, since thermocouples can die on you at the most inopportune times, just like a thermometer:
http://www.ebay.com/itm/311498596816?_t ... EBIDX%3AIT
Total for the three items you must have: $43.02. This is pretty darn inexpensive.
Most everything else, you can scrounge if you need it. You don't absolutely need a switch or an indicator light. But if you want a slightly fancy box, add these extras:
Note: I paid for this one, but a computer power supply from a tower model will suffice just fine and if you have an old computer sitting around, it's free. For this one, I'll have to drill/cut mounting holes and drill cooling holes as well. A puter power supply is much easier to drill out.
1. A box to put everything in. The inch dimensions on the Mypin TA4 PID I'm using are 2" wide X 2" tall X 3.25" deep, so this box gives room to mount the controller on one side in the front, the relay/heat sink on the other side back with the switches/indicators:
http://www.ebay.com/itm/201468189147?_t ... EBIDX%3AIT
2. A power cord. Normally, you can scrounge from your junkpile, but I recently chunked out all my old electronics stuff saying I didn't need any of that any more (what was I thinking). This cord is the same type that comes on computers and most things nowadays:
http://www.ebay.com/itm/321445265959?_t ... EBIDX%3AIT
3. An input power socket with a fuse to protect things. I wanted one that could be mounted solid with cheap rivets or screw/nut. This one will work nicely:
http://www.ebay.com/itm/231131988497?_t ... EBIDX%3AIT
4. An output power socket to plug your pot into. Again, rivet mountable:
http://www.ebay.com/itm/310631949052?_t ... EBIDX%3AIT
5. A couple indicator lights. One for when the unit has 110V power supplied and one for when the unit is putting power out to the casting pot:
http://www.ebay.com/itm/311008802596?_t ... EBIDX%3AIT
6. A switch with a "turned on" indicator light. Here's one and a spare:
http://www.ebay.com/itm/230913392971?_t ... EBIDX%3AIT
Total for these extra items: $49.18. Again, most all of this stuff can be scrounged or gotten cheaper if you're patient. You will also need what is called "hook up" wire in about 14 or 16 AWG. If you have a computer power supply, the wires from there will work and come in nice multiple colors. Just cut to length, strip insulation and you're done. I have a ton of the wire in my garage from where I rebuilt a 1986 aluminum bass boat, so I'm good with wire.
The only reason I bought the extras is I like fancy and I wanted to save myself some time hunting the stuff down. But even at that, all of the parts total, bought online, run right at $100.00 and you get what you want. I wanted a nice box, so I bought nice stuff.
Tell ya what, I'll just take pictures as I go building this up and post them, so you can see.
-
62chevy
- Founding Member
- Posts: 1617
- Joined: 17 Oct 2013 18:09
- My Press Choice: Turret
- Location: West Virginia
- Has thanked: 1017 times
- Been thanked: 323 times
Re: PID build, lapping and other fun stuff....
Thanks Dave that is just what I needed and if post pictures that will be bonus. Hope to have a spare 50 in February to buy what I need.
Je suis Charlie
-
slohunter
- Posts: 10
- Joined: 09 Nov 2015 20:10
- My Press Choice: Turret
- Location: Eastern Missouri
- Has thanked: 1 time
- Been thanked: 2 times
Re: PID build, lapping and other fun stuff....
Ditto, I have 3 different ones in the pot at the same time. All read different. Average out the 3,and I guess that is my temp.daboone wrote:There is a saying that "A man who has 2 watches never knows what time it is!" I'm quite certain that is true about casting thermometers. :twisted: I have an RCBS, Lymans and one from Rotometals. They all look pretty much the same but not one of them give the same reading in the same pot.DaveInGA wrote: That sounds like me the last time I tried to cast when I was unknowingly dealing with both a failing pot and a failing thermometer. Frustrating to say the least.
-
DaveInGA
- 250 Shots
- Posts: 279
- Joined: 18 Nov 2015 08:59
- My Press Choice: Progressive
- Location: Jefferson, GA
- Has thanked: 91 times
- Been thanked: 85 times
Re: PID build, lapping and other fun stuff....
I have my PID controller, SSR w/heat sink, K-type thermocouple, 120V power cable & signal lights in. I'm still waiting on the 120V power sockets, switch w/fuse holder to come in. I'll try to take some basic mock-up pictures tonight and post them tomorrow so you can see what you would be starting with.
-
DaveInGA
- 250 Shots
- Posts: 279
- Joined: 18 Nov 2015 08:59
- My Press Choice: Progressive
- Location: Jefferson, GA
- Has thanked: 91 times
- Been thanked: 85 times
Re: PID build, lapping and other fun stuff....
Here are the initial pictures of the PID components. I still have some components I'm waiting on. A check with ebay and they should be in by the 19th of this month. In the mean time, let's look at the major components I'm using. Note this is what I picked due to lack of time. If you have a little bit less cash and a bit more time, you can use alternates and scrounge most of what I'm going to be doing by stripping parts, wiring, boxes, etc off old computers and other obselete electronic equipment. That said, let's have a look:
1. Here's a pic to get an idea of size. I used a soda can instead of using a ruler, as it gives a much more easily compared visual impact. The PID is to the left, 25A SSR w/heat sink to the right, 110V indicator light in middle/front and Bud box in rear.
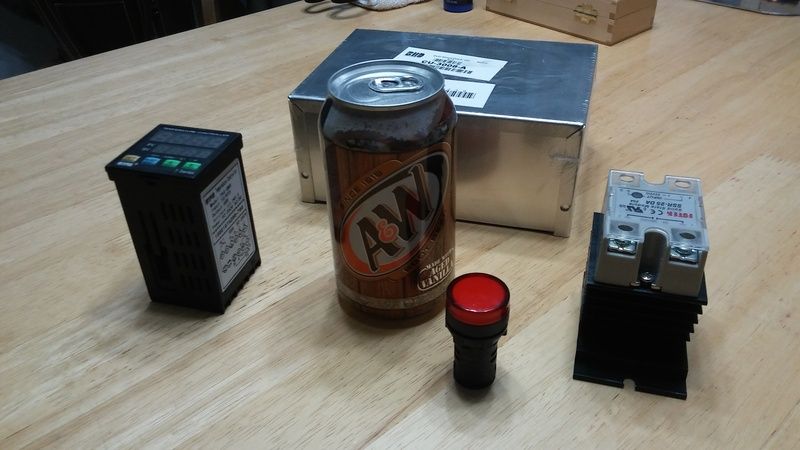
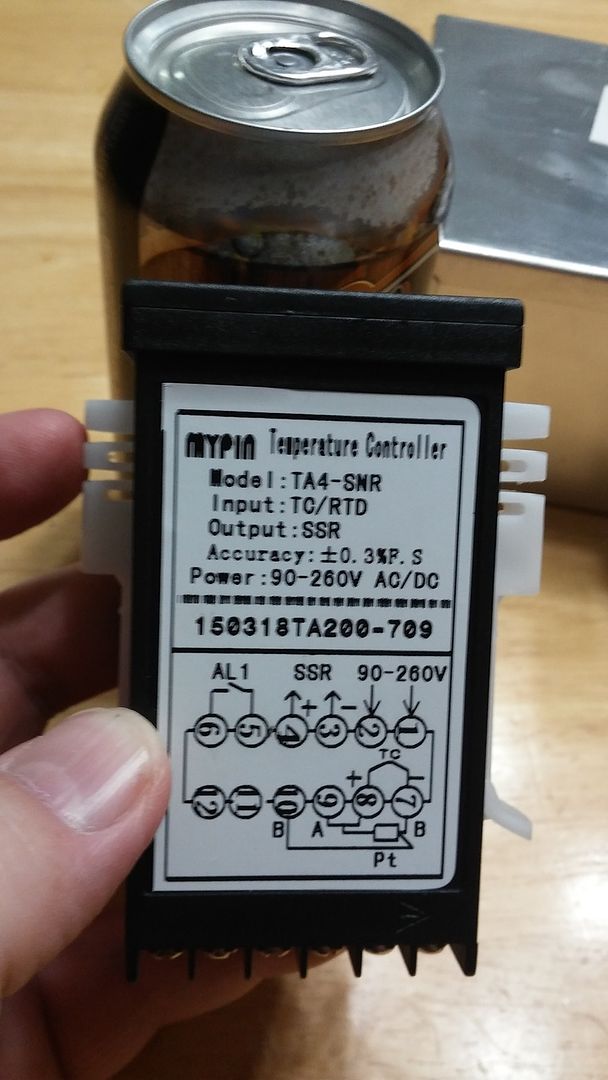
2. Here's a pic of the PID control face compared to the top of a soda can so you can get an idea of size. It's small, but you don't have to operate it for very long before it's set up. The LED display will be plenty large enough when lit up. Control buttons are simple. Technology developed in the late 1980's, early 1990's. Efficient and space saving.
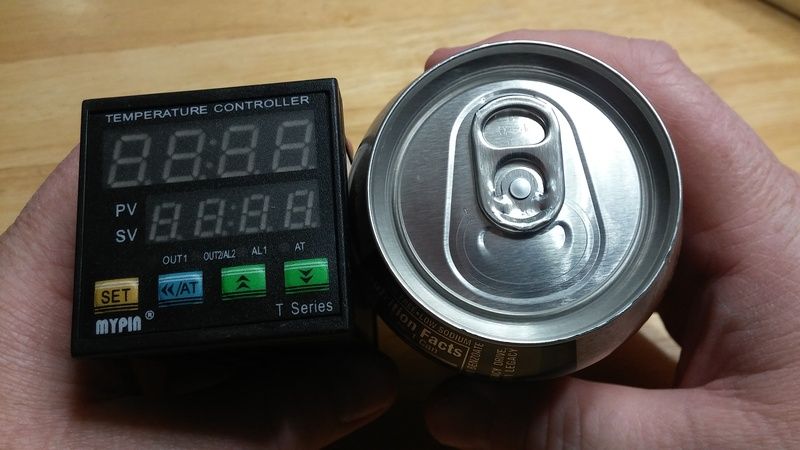
1. Here's a pic to get an idea of size. I used a soda can instead of using a ruler, as it gives a much more easily compared visual impact. The PID is to the left, 25A SSR w/heat sink to the right, 110V indicator light in middle/front and Bud box in rear.
2. Here's a pic of the PID control face compared to the top of a soda can so you can get an idea of size. It's small, but you don't have to operate it for very long before it's set up. The LED display will be plenty large enough when lit up. Control buttons are simple. Technology developed in the late 1980's, early 1990's. Efficient and space saving.
Last edited by DaveInGA on 14 Jan 2016 14:04, edited 1 time in total.
-
DaveInGA
- 250 Shots
- Posts: 279
- Joined: 18 Nov 2015 08:59
- My Press Choice: Progressive
- Location: Jefferson, GA
- Has thanked: 91 times
- Been thanked: 85 times
Re: PID build, lapping and other fun stuff....
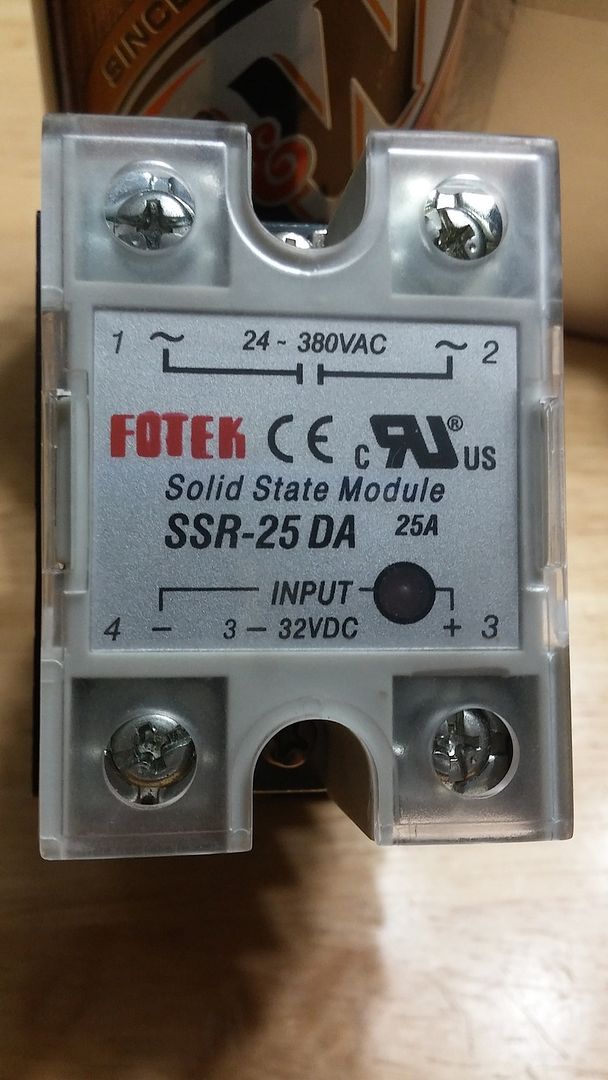
3. Here's a pic of the SSR w/heat sink compared to the soda can. As you can see, it's not nearly as large as a pic by itself would make it look.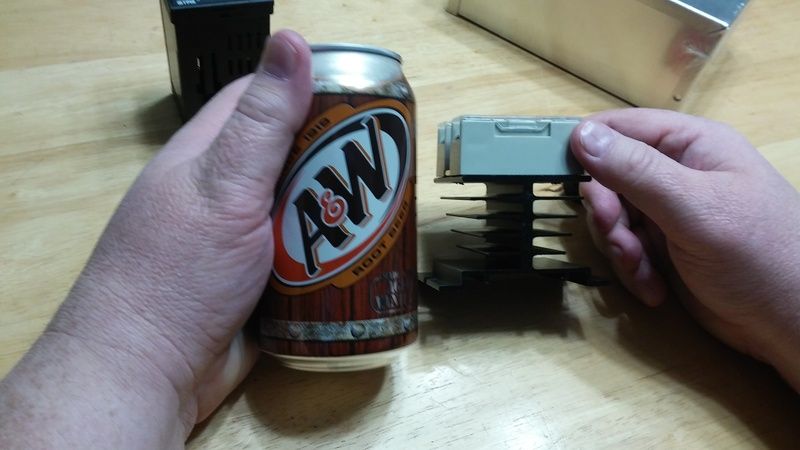
4. Here's the major components in a simple mockup laid on top of the Bud box. As you can see, there's plenty of room for air running through and for wiring as well. Note the part number of the Bud box on the sticker.
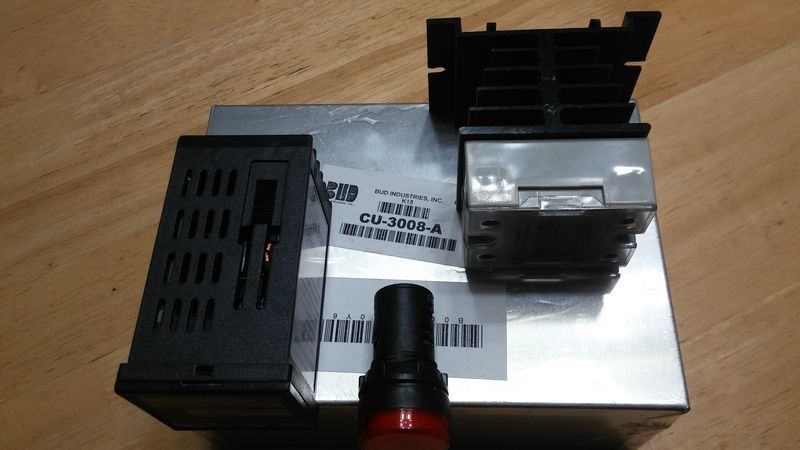
4. Here's the major components in a simple mockup laid on top of the Bud box. As you can see, there's plenty of room for air running through and for wiring as well. Note the part number of the Bud box on the sticker.
-
DaveInGA
- 250 Shots
- Posts: 279
- Joined: 18 Nov 2015 08:59
- My Press Choice: Progressive
- Location: Jefferson, GA
- Has thanked: 91 times
- Been thanked: 85 times
Re: PID build, lapping and other fun stuff....
5. A slightly different angle and you can get an idea of how the components will fit vertically. Notice if the 110V indicator light is placed at the bottom of the panel, there is room at the top for a lighted 110V switch with a fuse container. So one indicator light for "turned on" and one indicator light for "power to casting pot on."

6. Here's a pic of the connections label. Without checking the manual, here's the way I read it: 1 & 2 are your 110V input power. 3 & 4 are your DC control output signal to the SSR. 5 & 6 are pinouts for an alarm, possibly an indicator light, a buzzer, etc. 7 & 8 are your K-thermocouple connections. All connections are marked for polarity to help with wiring.
6. Here's a pic of the connections label. Without checking the manual, here's the way I read it: 1 & 2 are your 110V input power. 3 & 4 are your DC control output signal to the SSR. 5 & 6 are pinouts for an alarm, possibly an indicator light, a buzzer, etc. 7 & 8 are your K-thermocouple connections. All connections are marked for polarity to help with wiring.
-
DaveInGA
- 250 Shots
- Posts: 279
- Joined: 18 Nov 2015 08:59
- My Press Choice: Progressive
- Location: Jefferson, GA
- Has thanked: 91 times
- Been thanked: 85 times
Re: PID build, lapping and other fun stuff....
7. The SSR and it's connections. Pin 1 is where the hot lead/wire split off from your PID 110V power supply comes to. Pin 2 is where the hot lead going out to the hot lead on the power socket for the lead melting pot goes out from. Pin 3 is where the positive DC signal coming out of the PID goes into the SSR. Pin 4 is where the negative DC signal coming out of the PID goes into the SSR. When the PID sends a DC signal to the SSR, the SSR closes and current flows through the SSR from the 110V power supply and to the lead melting pot.
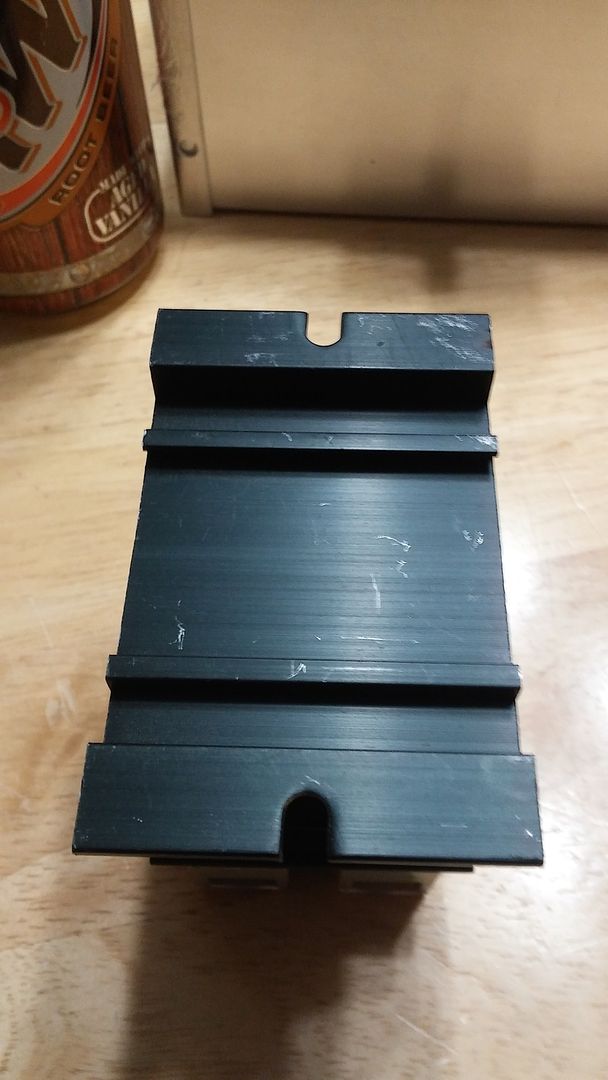
8. The SSR heat sink. This pic shows the part that connects/contacts the rear wall of the Bud box in the orientation I chose. The orientation is less important than the fact the SSR should be in the air and the heat sink should be pulling heat off the SSR to the air and finally to the rear of the box it's mounted in. If using this Bud box, you should drill holes in each side for air flow to cool both the SSR and the PID. A small 110V fan could be used to increase airflow, but isn't necessary in this application as long as the PID controller box is allowed to have airflow around and through it. This means you don't want to cover it or box it up with assorted junk when you're using it. For my purposes, I selected a longer K-thermocouple and power cord so I could place it up on a bench away from the heat of the lead pot and where it would get cooler air when in use. You can also place a small desk fan beside it to blow cool air through the box. Just remember to make sure there are air flow holes if you use this Bud box.
8. The SSR heat sink. This pic shows the part that connects/contacts the rear wall of the Bud box in the orientation I chose. The orientation is less important than the fact the SSR should be in the air and the heat sink should be pulling heat off the SSR to the air and finally to the rear of the box it's mounted in. If using this Bud box, you should drill holes in each side for air flow to cool both the SSR and the PID. A small 110V fan could be used to increase airflow, but isn't necessary in this application as long as the PID controller box is allowed to have airflow around and through it. This means you don't want to cover it or box it up with assorted junk when you're using it. For my purposes, I selected a longer K-thermocouple and power cord so I could place it up on a bench away from the heat of the lead pot and where it would get cooler air when in use. You can also place a small desk fan beside it to blow cool air through the box. Just remember to make sure there are air flow holes if you use this Bud box.
Last edited by DaveInGA on 14 Jan 2016 14:08, edited 1 time in total.