

Here are a couple of pictures that I thought might be useful for someone who is setting up a bullet feeder on the Load-Master.
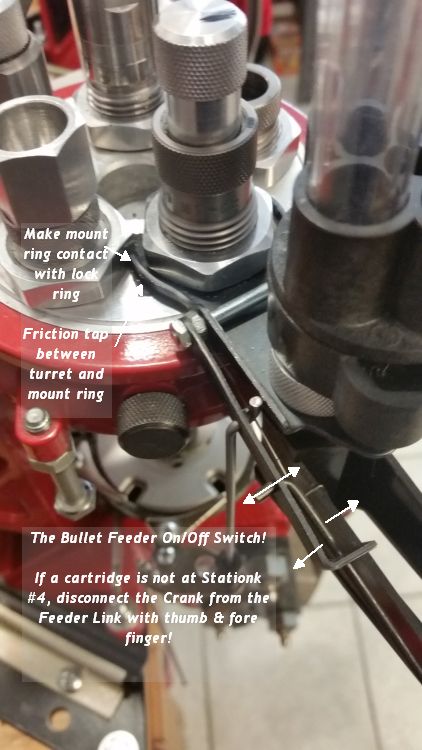
The bullet feeder Die Plate, the metal framed hole that the die slips through, is rather slick and coupled with the motion produced by the Action Rod, can loosen the die's lock ring. My solution has been to use a couple of very small strips of friction tape on the turret hole before setting the Die Plate down and tightening the die. Titan Reloading offers a Lock Nut Finger Wrench that is a must have.
I also make sure the lipped frame of the Die plate is up against Station #3's lock ring. The tape and the stop provided by the lock ring "next door" eliminates any left/right motion and keeps the assembly secure.
I've come to think of the joining of the Crank & Feeder Link as the on/off switch for the bullet feeder. Any time shell plate rotation leaves a case at this Station (#4), the link needs to be joined. If it's empty, it needs to be separated. It is very easy to separate the two parts with thumb and forefinger and not much more effort to put them together.
If you're like me, you might end up with or buy some used parts. Make sure that the Bullet Feeder assembly has the thin Return Spring across the bottom of the underside of the Die Plate with the wire ends that go up and across the Bullet Feeder Body. This spring can be ordered as an individual part (BF1174) for the earlier feeders. This simple spring was the fix that made the Bullet Feeder reliable. In the past, if you wanted a reliable feeder, you hung a large case like the 45-70 Govt from a string from the aft edge of the feeder. The weight of the case kept the feeder from flexing fore and aft. This thin spring removes all the play along that axis from the Bullet Feeder.
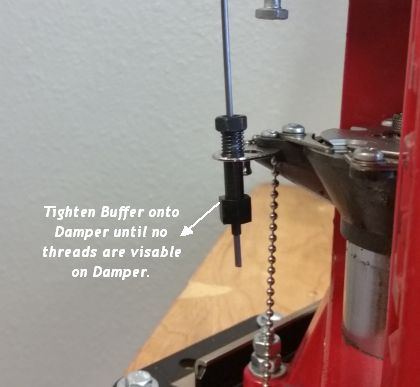
One question I've always had was how much to tighten the nylon Buffer onto the Damper. My answer has become to tighten it to the limit of the threads. In that it is nylon, I tighten it visually to the end of the threads.
With the last round of 30 Carbine ammo, the bullet fingers where not returning to the die. This is not covered in troubleshooting and I initially thought the Buffer might be worn. I tried a new one and the issue remained. I took the Action Rod off and wiped it with 320 grit sandpaper and the operation returned to normal. When I removed the Rod, it seemed very slick and I felt it might need some friction for the Buffer to act against. You might keep this in mind.
Finally, if you have any of the Lee progressive presses I encourage you to try the Bullet Feeder. It can only be added to a Bullet Seating die that has the tapered base on that die. The taper is what spreads the Bullet Fingers so the bullet can be released. If your bullet doesn't fit the Bullet Feeder Dies offered, I found out that the length of the opening is easy to modify and custom diameters are cheap. The Bullet Feeder is THE icing on the cake!